
Design Your Own Floral Arrangement with Hathaway Floral Design
We are so excited to have partnered with
Hathaway Floral Design on this amazing project! They have explained step by step how to create an easy and beautiful arrangement for your home using any flowers you purchase from the store!
Anybody can make a floral arrangement with a little bit of guidance. It may seem daunting at first, but hopefully, after reading these tips you’ll feel confident and ready to “wow” your friends and family!
The heart of floral design is creating something you love the look of, so try not to stress and remember to have some fun with it!
First and foremost, source your flowers…You may grow some of your own that you’d like to use, or if you’re like me you’ll need to go to a store and purchase them; my go-to spots are Trader Joe’s and Wegman’s!
Side Note - Make sure you decide on a color palette that you love ahead of time so that you don’t get overwhelmed with options!!
It’ll be tempting to go after all of the biggest, most striking varieties but in order to create a thoughtful arrangement that has character and interest you’ll want to choose flowers in different shapes and sizes that complement each other beautifully:


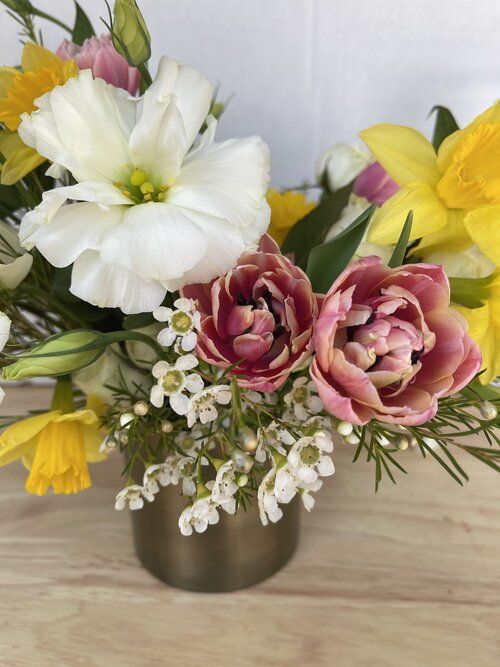
As a general guideline, I try to find 3-5 different bloom varieties and 1-3 greenery varieties. I always try to select a product that serves three very different and distinct purposes…A “base” flower that sits lower in the arrangement and typically takes up the most space, 1-2 varieties that I want to be the focal point of the arrangement, and then 1-2 (usually smaller) varieties to use as “floaters” that generally sit much further out and give the arrangement a soft, airy look.
In my arrangement I used the wax flower as my “greenery”, white spray roses as my “base”, white lisianthus and pink double tulips were my focal flowers and yellow daffodils for an extra pop of color. In this particular arrangement, I chose not to have floaters because at the specific store I went to I didn’t see any that I thought would be perfect for that purpose. However, if I really wanted to do floaters in this arrangement I could have cut the daffodils or the lisianthus much longer to achieve that look. Again, it all comes down to what looks and feels good to you!
Once you bring your flowers home, find a vase you love and fill it with fresh water, then use floral tape (can usually be found at Michael’s and other craft stores) or Scotch tape (cut into 1/4 inch wide strips) to create a “grid” over the top of the vase. For a medium-sized vase try to create about 9 squares in your grid, making sure to leave enough room to fit at least a couple of stems in each square.


Now that you’ve prepped your vessel, give all of your flowers and greenery a fresh cut using heavy-duty scissors or small garden pruners to make a diagonal cut an inch or so from the bottom of each stem.
Before you start placing stems decide what shape you are visually drawn to… this could be anything from a “V” shape with a dip in the middle, to an “S” shape that’s higher on one side and lower on the other, or maybe even a more traditional rounded shape. If you aren’t sure what you like it can be helpful to draw inspiration from Pinterest, or the Instagram accounts of your favorite florists :)


Start arranging by using your greenery to build out a base. This should have a rough resemblance to the general shape you’re trying to achieve, but it won’t really come together until you’ve started placing some of your other varieties!
Next, add in your “base” blooms. You may need to cut these a little shorter in order to get them to sit down lower in the arrangement. From there, place your focal blooms a little further out, making sure you place them in such a way that they are the first thing you notice about the arrangement. Throughout the process you may find that you need to play around with cutting some stems shorter and/or rearranging them in different places - that’s okay!


Lastly, place the smallest blooms, or “floaters”, coming out much further than the larger ones for a whimsical garden-inspired look. These can also be a great way to complete your “shape”
Now sit back and enjoy your creation!


PLAN YOUR EVENT